Learn functional programming with Redux

A few weeks ago, I implemented redux on my react project now renamed topheman/react-es6-redux.

What is Redux ?

Redux is a library made by Dan Abramov that evolves the ideas of Flux, avoiding its complexity (and lots of boilerplate). You can use it anywhere (client/server) with any library. Its goal is to solve the problem of state management in applications.

To do that, you have a single store that holds the state of your whole app as an object.

This store dispatches actions (make this kind of call from anywhere inside your app).

Those actions will pass through “reducers” which will process them and return a new state: (previousState, action) => newState (they are called “pure function” because no matter what, given the same arguments, they should always return the same result – no side effects).

Since all the app state exists in one place, you can combineReducers (split them so that they’ll each handle their part of the state).

This was a very short description of what is redux – more infos on redux.js.org.

How about functional programming ?

This paradigm has been around for a long time (it was there before Object Oriented programming) and if you’ve never heard of it, you’ve been using it for sure. I have been using both but I must say that I did learned design patterns in OOP but I never took any real interest in functional programming until recently, mostly because I was used to OOP.

What’s great with Redux is that if you digg just a little, you’ll learn a lot about:

  • immutability
  • functional programming
  • ES6+

If you’re doing UI in JavaScript, you should embrace those. Don’t be afraid, we’re already developping in ES6, you might find very interesting the approach of functional programming and immutability …

Resources:

Make your own React production version with webpack

react-webpack

If you’ve been developing with React, you must have seen that you are provided with very verbose errors/warnings that can come in handy.

Quote from the download page of React:

We provide two versions of React: an uncompressed version for development and a minified version for production. The development version includes extra warnings about common mistakes, whereas the production version includes extra performance optimizations and strips all error messages.

When you’re making your production bundle, you should not include all the extra code used in development (which makes extra checks not useful in production and at the end makes your bundle heavy).

The way to do that is to use the Webpack.DefinePlugin or envify, if you’re using browserify.

By doing the following, you’ll be injecting a variable process.env.NODE_ENV set to "production" at build time which is used inside React as we’ll see.

webpack.config.prod.js

module.exports = {
  //...
  plugins:[
    new webpack.DefinePlugin({
      'process.env':{
        'NODE_ENV': JSON.stringify('production')
      }
    }),
    new webpack.optimize.UglifyJsPlugin({
      compress:{
        warnings: true
      }
    })
  ]
  //...
}

That way, you’ll be including the same kind of code which is in react.min.js inside your bundle. If you take a look at the source code of React inside ./node_modules/react/lib, you’ll see a lot of places with a ternary like process.env.NODE_ENV !== 'production'. All those development related features will be dropped at the minification step.

Resources:

Continue reading

Optimize your bundle’s weight with webpack

webpack-logo

The usage of a package manager for the dependencies in front-end JavaScript development has become mainstream for some time now. One of the downsides is that since it’s now very easy to install and require external modules in your application, if you’re not careful, you’ll end up with a big main.js file in production …

To avoid that, you can use multiple strategies of optimization:

  • uglify
  • deduplicate code
  • split your bundle in multiple ones and only load them on demand

But the very first thing to do is to drop the unnecessary code. For that, webpack provides the Webpack.DefinePlugin which lets you inject your own variables at build time, so that if they are set to false in a conditional, the minification step will drop the dead code.

But if you are using ES6 modules import statement, there is a catch …

webpack.config.js

module.exports = {
  //...
  plugins:[
    new webpack.DefinePlugin({
      '__DEVTOOLS__': false //set it to true in dev mode
    }),
    new webpack.optimize.UglifyJsPlugin({
      compress:{
        warnings: true
      }
    })
  ]
  //...
}

test.js

import { DevTools, logger } from 'some-devtools';

if(__DEVTOOLS__){
  DevTools();
  logger();
}

With this configuration, the code inside the if statement will be dropped at minification since it will be inlined as if(false). But you’ll still be importing those packages that you won’t be using (aka dead code).

In this case you shouldn’t be using ES6 static imports but CommonJS require syntax:

if(__DEVTOOLS__){
  const { DevTools, logger } = require('some-devtools');
  DevTools();
  logger();
}

That way, if __DEVTOOLS__ === false, not only the calls inside this if statements will be dropped but the modules DevTools and logger wont even be part of the bundle, which will make it lighter.

Note: I made this example with webpack, but this kind of feature is available on other module bundlers such as browserify. An other way to resolve that kind of problem would be to specify a list of modules to exclude at build time in production mode …

Update: If you’re doing universal JavaScript (running your code on both client and server side), a good practice would be to use process.env.DEVTOOLS instead of __DEVTOOLS__. A good example is the React setup where you make your own production version of React.

Resources:

Upgraded to react v0.14

logo-reactjs

The genesis of the project:

On october 7th, 2015, Facebook released the v0.14 of React. I took it as an opportunity to get back at React and upgrade those projects to the latest version, to check it out.

The easy part

Upgrading React was in fact the easy part … Since my app was react-warnings free, as said on the upgrade-guide, I only had to:

  • switch to react-dom (and react-dom/server for the server-side). As of now the render engine is a different module (React already did the render on browser and server, but now that there is react-native, it really makes sense to split)
  • switch to react-addons-* modules and drop React.addons which were deprecated (more modularity)

The tricky part

I was using react-router@0.13.2 and by upgrading to react@0.14.0, I ran into invalid peerDependencies problem (react-router@0.13.x couldn’t work with a version of React over 0.13).

So I also upgraded react-router to the v1.0.0-rc3, which has a new API … In fact, the refactor went pretty smoothly for the client-side part (the upgrade guide is well documented).

But for the server-side, I hit an issue: on previous versions, you could attach pretty much any attribute to the object passed from the router to your components. Now if you do that, it won’t get all the way down to your components. The workaround I finally found is to attach those data to the params attribute of the object passed by the router and retrieve them in the props.params of the component … There might be a better way (the createElement API …)

UPDATE: Since then, react-router has released the v0.13.4 which is compatible with react@0.13.x, but I’m glad I did the upgrade, so now I have a client & a server-side project that work with the latest versions of React & react-router!

Sugar

I refactored some components with the syntax introduced in react@0.14 for stateless functional components using ES6 fat arrow (no this, class or anything alike).

As I was at it, I enhanced the build routines:

  • I added banners on html/js/css containing description/version/git revision (something I’m doing by default now on my projects) – for those who are building their project on heroku, check this commit 😉
  • I fixed react-hot-reload for the client-side project (this is a great workflow)
  • I fixed livereloading for the server-side project (when you make changes on a component in development, not only your browser has to reload but your also has your node server, since there is server-side rendering and they both need to have the same version)

Conclusion

This sprint was a great exercise to get back into React – both client and server-side. I also got to play with webpack and gulp (yeah, I enjoy setting up build routines 🙂 ). But moreover, coding in ES6 is great … I enjoy it, I did it on my previous project and please, don’t get left behind, don’t fear webpack/Babel, those are great tools that you could easily setup via a yeoman generator or a boilerplate from git …

I’ll keep using React, I do like this library. My next steps will be to add some animation/transition and setting up redux (or a flux-like implementation).

Tophe

All the code is available on github, each tag has its own release providing a changelog with a list of items pointing to the commits of the version, so if you want to take a peak, please do.

Resources:

Setup Travis CI & SauceLabs for Protractor

travis-ci-sauceLabs-protractor-bandeau

Add end to end testing to your continuous integration

You already know those technologies ? Jump directly to how to setup Travis CI & SauceLabs for Protractor.

Reminders

What are Travis CI, SauceLabs & Protractor ?

Protractor is an end-to-end test framework for AngularJS applications. It can also test any non-angular applications since it’s a wrapper around WebDriverJs (which controls the Selenium Server) and Jasmine (which brings the testing framework).

selenium
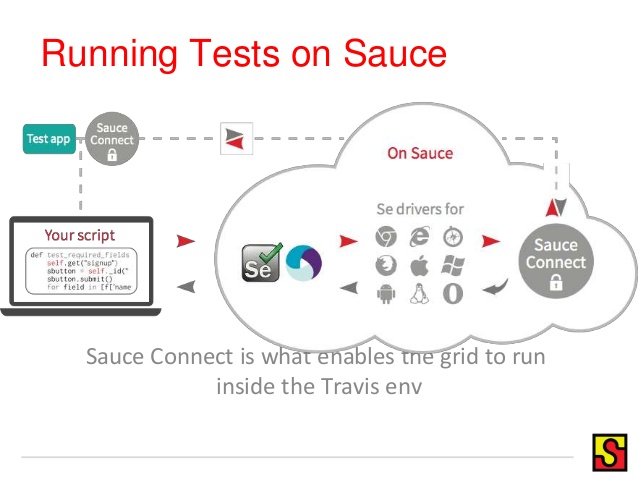
Via Selenium, it will send commands to web browsers (like “click here” then “check if this is displayed”, “populate that field”, “submit the form” then “check if we are logged in” …).

SauceLabs is a cross-browser automation tool built on top of Selenium WebDriver. It lets you run your end-to-end tests on multiple browsers and operating systems, in the cloud (you can run tests in multiple vms in parallel). It integrates very well in CI tools such as Travis CI.

Travis CI is an open-source hosted, distributed continuous integration service used to build and test projects hosted at GitHub. You configure it with a simple .travis.yml file where you specify your CI workflow (you can launch test scripts as well as deploy scripts).

It will try to build your project and run your tests on each push (on any branches, including pull-requests). It supports many languages and you’ll see a lot of open-source projects using it.

If you want to know more – some resources:

Why use SauceLabs with Travis CI ?

By default, Travis CI doesn’t provide extended features for e2e testing. You’ll see that on SauceLabs, you can use your Protractor/Selenium tests “as is” (just add a little config) and get lots of interesting informations such as extended logs, screencast (video playback) …

Setup Travis CI & SauceLabs for Protractor

This part takes for granted that you already know how to run protractor tests in local.

Pre-requisites

Create a SauceLabs account

Download Travis cli

Follow these instructions to download the Travis Command Line Interface.

Setup SauceLabs credentials

Go to your SauceLabs account and retrieve your ACCESS KEY. Then, at the root of your project:

travis login

#the following will encrypt and add the tokens to your .travis.yml

travis encrypt SAUCE_USERNAME=[your-SauceLabs-login] --add
travis encrypt SAUCE_ACCESS_KEY=[your-SauceLabs-AccessKey] --add

Enable Sauce Connect addon for Travis CI

Travis CI integration with SauceLabs automatically sets up a tunnel required to get started testing with. To do that we need to enable the Sauce Connect addon for Travis CI.

To enable Sauce Connect for Travis CI, add the following to your .travis.yml file:

addons:
  sauce_connect: true

That way, the e2e tests launched on your Travis CI will be executed on SauceLabs’s Selenium server which in return will have access to the test server you’ll be running from your Travis CI – all this, via Sauce Connect’s encrypted tunnel.

running-tests-on-sauce-connect

Upgrade your protractor config

Add the following to your protractor config file. This is a basic config. It won’t affect your local tests, it will only activate when running on Travis CI:

if (process.env.TRAVIS) {
  config.sauceUser = process.env.SAUCE_USERNAME;
  config.sauceKey = process.env.SAUCE_ACCESS_KEY;
  config.capabilities = {
    'browserName': 'chrome',
    'tunnel-identifier': process.env.TRAVIS_JOB_NUMBER,
    'build': process.env.TRAVIS_BUILD_NUMBER
  };
}

Feel free to customize it (if you don’t work with protractor but only Selenium WebDriver, it’s about the same).

Don’t forget to add the task running protractor to the tests to be run by Travis CI on the .travis.yml file, in the script section.

Tips

Keep in mind you’ll need a server to run your e2e tests against (this is not unit testing), so you will have to launch an instance of this server in the before_script part of the .travis.yml file.

Since you are doing tests, this server might have to be in “test” mode (providing mock results on API endpoints for example).

Even if your app is full front-end and doesn’t rely on a backend you built, you will have to provide a server to run your e2e tests on (this is my case on topheman/vanilla-es6-jspm).

Good thing to know: when you develop in ES6 using runtime transpiling (like babel-runtime), a lot of different scripts are loaded (and evaled browser-side), which can raise timeouts SauceLabs-side (that you didn’t have on your local computer when running your e2e tests).

To avoid that, run your e2e tests against a bundled version of your website (all scripts/assets bundled/concateneted in one or a few files). This will relieve the traffic on the sauce tunnel and the VM, SauceLabs-side (that may not be as powerfull as your computer).

Resources

I set up Travis CI with SauceLabs for Protractor on my latest project: topheman/vanilla-es6-jspm, to have my e2e test being a part of my continuous integration workflow.

Take a look at the commit where I added the feature, it could give you some ideas of implementation …

Tophe

Edit: Using React ? Here is one of my latest projects topheman/react-es6-redux where I also setup SauceLabs (amongst other things like unit-tests, code coverage on es6+ …)