Tag Archives: Travis Ci

Continuous deployment with Travis CI

This post is inspired by the notes I published on my project topheman/npm-registry-browser where you can find an application of the continuous deployment I will be writing about.

Before starting

  • I’m assuming that you have a build step (like npm run build) that creates a build folder containing anything that should be deployed
  • I will assume that you already have a test suite running on Travis CI
  • I will use github pages as hosting for my production server
  • I will use surge.sh as hosting for my staging server (BONUS)
  • The API server is not part of the flow I’m describing (hosted on another server)

I’m using the github flow which is very suited for continuous deployment (this is not a requirement). Reminder:

  • Anything on master is deployable
  • Working on a feature / a fix ? Create a branch
  • Commit to that branch locally and regularly push to the same named branch on the server
  • Open a pull-request when need feedback or ready to merge
  • Once reviewed and approved, merge to master
  • Once merged to master, it should be deployable

Goal

Here is the Continuous Deployment workflow we will setup (this is a little opiniated, you might have slightly different needs, the use cases are wide enough so that you can choose to either blindly follow or adapt):

  • Only tagged commits pushed on master will deploy to production. That way, we can choose when we want to ship to production, all we’ll have to do is tag a commit and push it.
  • Each time we ship to production, we’ll also upload the generated build folder to github to make it available in the releases section
    • teams won’t need the whole toolchain to retrieve a specific build (a simple download will do the job)
    • if a weird bug is filled for a specific version, we track the exact files that were deployed on the server
  • Each push on master will deploy to staging. That way, the QA team will have access to the latest features and will be able to report bugs that we’ll fix before finally shipping to production.

Of course, these deployments, will only happen if all the tests pass first. We won’t deploy any failing build.

Setup

Create a github token

First, you will need to create a github token to:

  • deploy on github pages
  • upload your generated build files to the releases section

1) Go to https://github.com/settings/tokens and generate a token that has at least the scope public_repo.
2) Go to https://travis-ci.org/<owner>/<project>/settings (the dashboard of your project on Travis CI) and add the token as the env variable GITHUB_TOKEN.

Deploy production to github pages

In your .travis.yml file, you will add the following:

before_deploy:
  - npm run build
deploy:
  - provider: pages
    skip_cleanup: true # Don't re-run the tests
    github_token: $GITHUB_TOKEN
    keep_history: true
    local_dir: build
    on:
      tags: true
      branch: master

You can do some deployment tests on a feature branch, just temporarily update the on section.

To check if it works on the master branch, you just have to push a tag. Example:

git tag tag-test-release-production
git push --tags origin master

Once it’s done, you can clean the tag locally (and remotly) like that (if you wish):

git tag --delete tag-test-release-production
git push --delete origin tag-test-release-production

Upload artefacts to github releases

Since we can only upload one file at a time, we will start by compressing the build folder into an archive. Update the before_deploy section of your .travis.yml file:

before_deploy:
  - npm run build
  - tar czvf build.tar.gz -C build .

Then, add a new provider to the deploy section:

deploy:
  - provider: releases
    api_key: $GITHUB_TOKEN
    file: "./build.tar.gz"
    skip_cleanup: true
    on:
      tags: true
      branch: master

Deploy to staging using surge

As you already saw, you can use multiple providers, but you can also trigger them on different occasions. Say you would like to deploy on a staging server each time someone pushes on master ? Here is an example of how to do it with surge.sh (a static site hosting solution – you may use a similar one):

Add the 2 following env vars to the travis settings of your repo:

  • SURGE_LOGIN: Set it to the email address you use with Surge
  • SURGE_TOKEN: Set it to your login token (get it by running surge token)

Add the following to the deploy section of your .travis.yml (specify your domain name):

deploy:
  - provider: surge
    project: ./build/
    domain: example.surge.sh
    skip_cleanup: true

Notes

A lot of providers are supported by Travis CI, the ones exposed in this article are just examples (as is the workflow). If you are deploying to an unsupported hosting service (or you have some custom workflow), you can make your own deploy.sh script.

Deploy hooks aren’t executed on PRs. You don’t have to worry about malicious deployment or leaking tokens to untrusted forks: both encypted travis variables and environment values set via repo settings are not provided to untrusted builds, triggered by pull requests from another repository (source).

You could use the after_deploy hook to make a curl request to make sure the deployment went through (if you have some metadatas such as the git hash or the date of the generated build, you can be 100% sure it has been deployed) – see how to inject metadatas into your generated build.

I’m using everything I described above in my project topheman/npm-registry-browser.

Setup Travis CI & SauceLabs for Protractor

travis-ci-sauceLabs-protractor-bandeau

Add end to end testing to your continuous integration

You already know those technologies ? Jump directly to how to setup Travis CI & SauceLabs for Protractor.

Reminders

What are Travis CI, SauceLabs & Protractor ?

Protractor is an end-to-end test framework for AngularJS applications. It can also test any non-angular applications since it’s a wrapper around WebDriverJs (which controls the Selenium Server) and Jasmine (which brings the testing framework).

seleniumVia Selenium, it will send commands to web browsers (like “click here” then “check if this is displayed”, “populate that field”, “submit the form” then “check if we are logged in” …).

SauceLabs is a cross-browser automation tool built on top of Selenium WebDriver. It lets you run your end-to-end tests on multiple browsers and operating systems, in the cloud (you can run tests in multiple vms in parallel). It integrates very well in CI tools such as Travis CI.

Travis CI is an open-source hosted, distributed continuous integration service used to build and test projects hosted at GitHub. You configure it with a simple .travis.yml file where you specify your CI workflow (you can launch test scripts as well as deploy scripts).

It will try to build your project and run your tests on each push (on any branches, including pull-requests). It supports many languages and you’ll see a lot of open-source projects using it.

If you want to know more – some resources:

Why use SauceLabs with Travis CI ?

By default, Travis CI doesn’t provide extended features for e2e testing. You’ll see that on SauceLabs, you can use your Protractor/Selenium tests “as is” (just add a little config) and get lots of interesting informations such as extended logs, screencast (video playback) …

Setup Travis CI & SauceLabs for Protractor

This part takes for granted that you already know how to run protractor tests in local.

Pre-requisites

Create a SauceLabs account

Download Travis cli

Follow these instructions to download the Travis Command Line Interface.

Setup SauceLabs credentials

Go to your SauceLabs account and retrieve your ACCESS KEY. Then, at the root of your project:

travis login

#the following will encrypt and add the tokens to your .travis.yml

travis encrypt SAUCE_USERNAME=[your-SauceLabs-login] --add
travis encrypt SAUCE_ACCESS_KEY=[your-SauceLabs-AccessKey] --add

Enable Sauce Connect addon for Travis CI

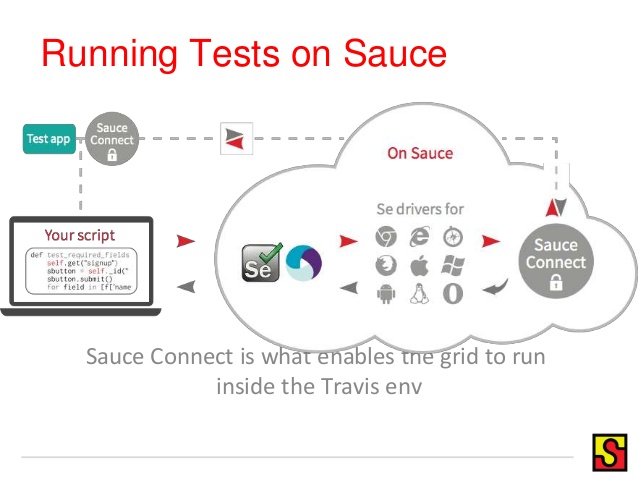
Travis CI integration with SauceLabs automatically sets up a tunnel required to get started testing with. To do that we need to enable the Sauce Connect addon for Travis CI.

To enable Sauce Connect for Travis CI, add the following to your .travis.yml file:

addons:
  sauce_connect: true

That way, the e2e tests launched on your Travis CI will be executed on SauceLabs’s Selenium server which in return will have access to the test server you’ll be running from your Travis CI – all this, via Sauce Connect’s encrypted tunnel.

running-tests-on-sauce-connect

Upgrade your protractor config

Add the following to your protractor config file. This is a basic config. It won’t affect your local tests, it will only activate when running on Travis CI:

if (process.env.TRAVIS) {
  config.sauceUser = process.env.SAUCE_USERNAME;
  config.sauceKey = process.env.SAUCE_ACCESS_KEY;
  config.capabilities = {
    'browserName': 'chrome',
    'tunnel-identifier': process.env.TRAVIS_JOB_NUMBER,
    'build': process.env.TRAVIS_BUILD_NUMBER
  };
}

Feel free to customize it (if you don’t work with protractor but only Selenium WebDriver, it’s about the same).

Don’t forget to add the task running protractor to the tests to be run by Travis CI on the .travis.yml file, in the script section.

Tips

Keep in mind you’ll need a server to run your e2e tests against (this is not unit testing), so you will have to launch an instance of this server in the before_script part of the .travis.yml file.

Since you are doing tests, this server might have to be in “test” mode (providing mock results on API endpoints for example).

Even if your app is full front-end and doesn’t rely on a backend you built, you will have to provide a server to run your e2e tests on (this is my case on topheman/vanilla-es6-jspm).

Good thing to know: when you develop in ES6 using runtime transpiling (like babel-runtime), a lot of different scripts are loaded (and evaled browser-side), which can raise timeouts SauceLabs-side (that you didn’t have on your local computer when running your e2e tests).

To avoid that, run your e2e tests against a bundled version of your website (all scripts/assets bundled/concateneted in one or a few files). This will relieve the traffic on the sauce tunnel and the VM, SauceLabs-side (that may not be as powerfull as your computer).

Resources

I set up Travis CI with SauceLabs for Protractor on my latest project: topheman/vanilla-es6-jspm, to have my e2e test being a part of my continuous integration workflow.

Take a look at the commit where I added the feature, it could give you some ideas of implementation …

Tophe

Edit: Using React ? Here is one of my latest projects topheman/react-es6-redux where I also setup SauceLabs (amongst other things like unit-tests, code coverage on es6+ …)